To add documents to your document locker follow the steps below.
Step 1: Log into the VAIRKKO Platform
Step 2: Access the Administrative area by clicking 'ADMIN' in the upper right-hand corner.
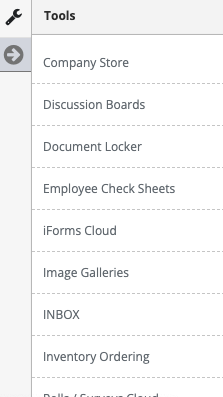
Step 3: Access the 'Document Locker' from the Administrative Toolbar
Step 4: Select the 'Add Document' tab

Step 5: Follow the on-screen prompts to add your document
Managing Documents
Step 1: Select the 'Available Documents' tab
Step 2: From the actions button next to the document you can view the document, edit the document settings, or copy a direct link to the document

Folders
- Root Folder - A Root folder is the outer most displayed name. For example, if you upload a document called 'Vacation Form' this document will be displayed on the folders screen as the title.
- New Root Folder - To create a new root folder select the 'Add New Folder Option'. For example, You can upload that same vacation form but create a new folder called 'Forms' and Forms will be displayed as the root folder with the vacation form found inside
- New Sub Folder - To create a subfolder select the 'Add New Folder Option' and set the Parent folder. For example, you can create a 'Personnel' folder located within the Forms folder and store the Vacation Form there.
Additional Information
Once a document has been uploaded the storage folder can be changed by editing the document.
Documents can be deleted from either the 'Edit Document' area or by selecting the check box next to the document and selecting remove